Django Authentication Part 3: Adding Python Social Auth
 By
By

Introduction
This is the third article in a multipart series on implementing the Django authentication system. I will continue to use the same demo survey application, which I refer to as Djang Survey, to aid in the demonstration of the many features of Django authentication.
Each article of this series focusses on a subset of authentication features that can be implemented with Django. This third article focusses on how to integrate social authentication with the help of Python Social Auth. Specifically, I will be showing how to integrate user login via Google OAuth2.
Series Contents:
- Django Authentication Part 1: Sign Up, Login, Reset Password, Logout
- Django Authentication Part 2: Object Permissions with Django Guardian
- Django Authentication Part 3: Adding Python Social Auth (your're here)
- Django Authentication Part 4: Email Registration and Password Resets
The code for this series can be found on GitHub.

Configuring Google OAuth2 in Google Developer Console
In order to use Google's OAuth2 service for authenticating users I need to create an application in the Google developer console. After that I can create OAuth API credentials to use inside the Django Survey app in conjunction with Python Social Auth. This will be the focus for the section.
Now I hesitate to include many screenshots at all of this process because user interfaces like this tend to change quite frequently but, I have decided to do so anyway. In the event that the UIs change I'm hoping that my descriptions of the general process will be enough to help the reader navigate through the process.
- Log into your console.developers.google.com account, select the app dropdown at the top then, click new project

- Fill out the new project form

- Click credentials in the left menu to open the create credentials dialog

- Click Configure consent screen and fill out the following form

- Select Web application, give it a name, then add the Django dev server google-outh2 redirect url which is http://localhost:8000/complete/google-oauth2/
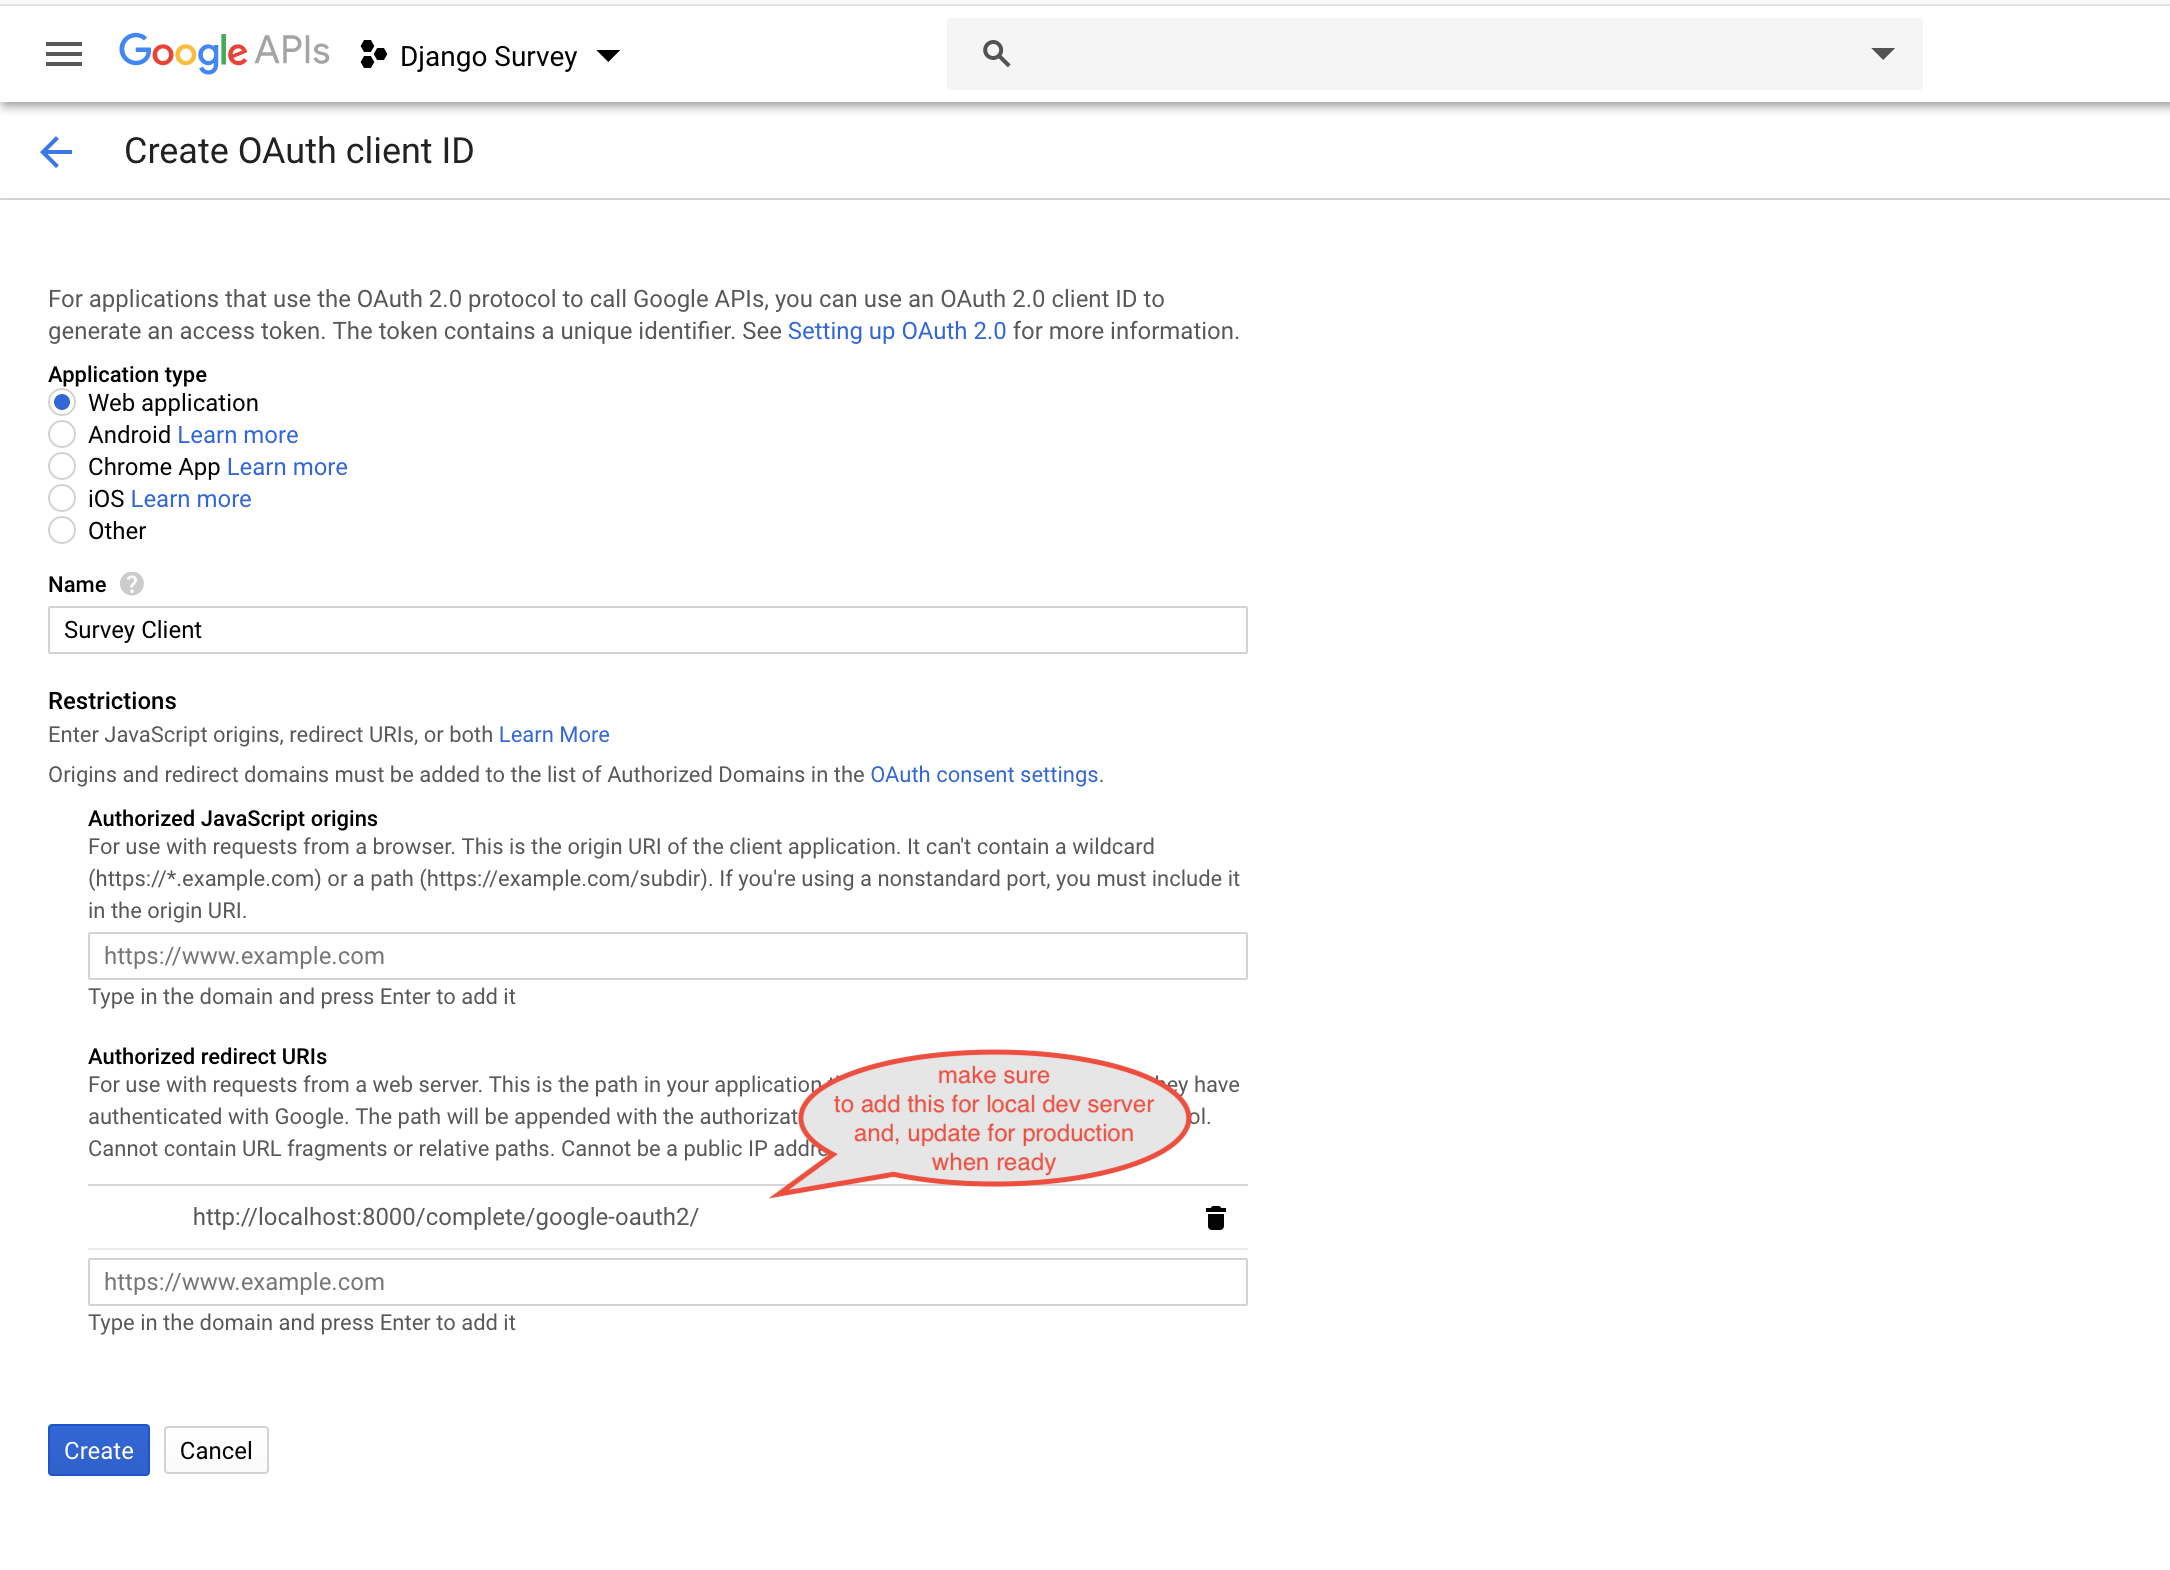
After clicking create the client id and client secret are displayed which I copy and place in a safe place.
Integrating Python Social Auth into Django Project
This section will cover installing and configuring the Python Social Auth package for Django which is pretty heavy on the configuration side. To begin I install Python Social Auth using pip inside my activated python virtual environment.
(venv) $ pip install social-auth-app-djangoDjango Settings for Python Social Auth
Then I update the project settings at django_survey/settings.py variables listed below:
- INSTALLED_APPS - letting Django know of its existence
- MIDDLEWARE - provides messages to the user when social auth raises exceptions and, in this case, used to redirect the user to the url set in the LOGIN_ERROR_URL
- LOGIN_ERROR_URL - explained in MIDDLEWARE
- AUTHENTICATION_BACKENDS - explicitly add capability for GoogleOAuth2
- SOCIAL_AUTH_GOOGLE_OAUTH2_KEY - Google OAuth2 credentials from the last step of the previous section
- SOCIAL_AUTH_GOOGLE_OAUTH2_SECRET - Google OAuth2 credentials from the last step of the previous section
- TEMPLATES - associates social auth users with some some data to be used in templates
- SOCIAL_AUTH_URL_NAMESPACE - specifies the url namespace of social auth urls which is useful for explicitly indicating when you are using social auth rather than standard auth
- SOCIAL_AUTH_PIPELINE - used for specifying what data to associate with the user originating from the social auth provider as well as stringency of the auth process
Disclaimer! I am going to break off into a bit of a tagent about security and properly managing things like app passwords as well as API credentials but, I will keep it short and to the point ... NEVER PUT THESE IN SOURCE CONTROL!!!
A much better approach is to use a hidden .env file which holds these sensitive item as environment variables which can then be excluded from source control by including them in the projects .gitignore file. Tthere are various ways to use hidden environment variable files (aka .env) but, the way I like to do it is through the python-dotenv library which I pip install as shown below.
(venv) $ pip install python-dotenvNext I make a .env file in the root of my project next to the manage.py file which contains the client ID and client secret from the Google developer console set up.
# .env
SOCIAL_AUTH_GOOGLE_OAUTH2_KEY='my-google-oauth-client-id'
SOCIAL_AUTH_GOOGLE_OAUTH2_SECRET = 'my-google-oath-secret'
Then in the settings.py module I import the load_dotenv function from the dotenv module installed previously. This load_dotenv function is passed the path to the .env file which it reads and injects the values into the environemnt accessible via the os module from the Python standard library.
Below is my complete django_survey/settings.py module.
# settings.py

import os
from dotenv import load_dotenv

# Build paths inside the project like this: os.path.join(BASE_DIR, ...)
BASE_DIR = os.path.dirname(os.path.dirname(os.path.abspath(__file__)))

load_dotenv(verbose=True, dotenv_path=os.path.join(BASE_DIR, '.env'))

# Quick-start development settings - unsuitable for production
# See https://docs.djangoproject.com/en/2.2/howto/deployment/checklist/

# SECURITY WARNING: keep the secret key used in production secret!
SECRET_KEY = 'szn5kz6r*+*13h$^llg8l6!45p+9d_nz)d3w03fnn+guhtpm@9'

# SECURITY WARNING: don't run with debug turned on in production!
DEBUG = True

ALLOWED_HOSTS = []

# Application definition

INSTALLED_APPS = [
    'django.contrib.admin',
    'django.contrib.auth',
    'django.contrib.contenttypes',
    'django.contrib.sessions',
    'django.contrib.messages',
    'django.contrib.staticfiles',
    'django_extensions',
    'survey.apps.SurveyConfig',
    'widget_tweaks',
    'guardian',
    'social_django',
]

MIDDLEWARE = [
    'django.middleware.security.SecurityMiddleware',
    'django.contrib.sessions.middleware.SessionMiddleware',
    'django.middleware.common.CommonMiddleware',
    'django.middleware.csrf.CsrfViewMiddleware',
    'django.contrib.auth.middleware.AuthenticationMiddleware',
    'django.contrib.messages.middleware.MessageMiddleware',
    'django.middleware.clickjacking.XFrameOptionsMiddleware',
    'social_django.middleware.SocialAuthExceptionMiddleware'
]

AUTHENTICATION_BACKENDS = [
  'social_core.backends.google.GoogleOAuth2',
  'django.contrib.auth.backends.ModelBackend',
  'guardian.backends.ObjectPermissionBackend',
]

ROOT_URLCONF = 'django_survey.urls'

TEMPLATES = [
    {
        'BACKEND': 'django.template.backends.django.DjangoTemplates',
        'DIRS': [],
        'APP_DIRS': True,
        'OPTIONS': {
            'context_processors': [
                'django.template.context_processors.debug',
                'django.template.context_processors.request',
                'django.contrib.auth.context_processors.auth',
                'django.contrib.messages.context_processors.messages',
                'social_django.context_processors.backends',
                'social_django.context_processors.login_redirect',
            ],
        },
    },
]

WSGI_APPLICATION = 'django_survey.wsgi.application'


# Database
# https://docs.djangoproject.com/en/2.2/ref/settings/#databases

DATABASES = {
    'default': {
        'ENGINE': 'django.db.backends.sqlite3',
        'NAME': os.path.join(BASE_DIR, 'db.sqlite3'),
    }
}


# Password validation
# https://docs.djangoproject.com/en/2.2/ref/settings/#auth-password-validators

AUTH_PASSWORD_VALIDATORS = [
    {
        'NAME': 'django.contrib.auth.password_validation.UserAttributeSimilarityValidator',
    },
    {
        'NAME': 'django.contrib.auth.password_validation.MinimumLengthValidator',
    },
    {
        'NAME': 'django.contrib.auth.password_validation.CommonPasswordValidator',
    },
    {
        'NAME': 'django.contrib.auth.password_validation.NumericPasswordValidator',
    },
]


# Internationalization
# https://docs.djangoproject.com/en/2.2/topics/i18n/

LANGUAGE_CODE = 'en-us'

TIME_ZONE = 'UTC'

USE_I18N = True

USE_L10N = True

USE_TZ = True


# Static files (CSS, JavaScript, Images)
# https://docs.djangoproject.com/en/2.2/howto/static-files/

STATIC_URL = '/static/'

# custom
LOGOUT_REDIRECT_URL='/login/'
LOGIN_REDIRECT_URL='/profile/'
LOGIN_URL='/login/'
LOGIN_ERROR_URL = '/login/'

# social auth
SOCIAL_AUTH_URL_NAMESPACE = 'social'
SOCIAL_AUTH_GOOGLE_OAUTH2_KEY = os.getenv('SOCIAL_AUTH_GOOGLE_OAUTH2_KEY')
SOCIAL_AUTH_GOOGLE_OAUTH2_SECRET = os.getenv('SOCIAL_AUTH_GOOGLE_OAUTH2_SECRET')

SOCIAL_AUTH_PIPELINE = (
    'social_core.pipeline.social_auth.social_details',
    'social_core.pipeline.social_auth.social_uid',
    'social_core.pipeline.social_auth.auth_allowed',
    'social_core.pipeline.social_auth.social_user',
    'social_core.pipeline.user.get_username',
    'social_core.pipeline.user.create_user',
    'social_core.pipeline.social_auth.associate_user',
    'social_core.pipeline.social_auth.load_extra_data',
    'social_core.pipeline.user.user_details',
)
Following that I update the project's main django_surveny/urls.py URLConf to include the social_django urls like so.
# django_survey/urls.py

from django.contrib import admin
from django.urls import path, include

urlpatterns = [
    path('admin/', admin.site.urls),
    path('', include('survey.urls')),
    path('', include('social_django.urls')),
]
And last but, not least, I run the newly introduced Python Social Auth migrations.
(venv) $ python manage.py migrate
Operations to perform:
  Apply all migrations: admin, auth, contenttypes, guardian, sessions, social_django, survey
Running migrations:
  Applying social_django.0001_initial... OK
  Applying social_django.0002_add_related_name... OK
  Applying social_django.0003_alter_email_max_length... OK
  Applying social_django.0004_auto_20160423_0400... OK
  Applying social_django.0005_auto_20160727_2333... OK
  Applying social_django.0006_partial... OK
  Applying social_django.0007_code_timestamp... OK
  Applying social_django.0008_partial_timestamp... OK
Updating the Login Django Template
First things first I should add new login buttons for logging in with Google to the login page like so.
<!-- login.html -->
{% extends 'survey/base.html' %}
{% load widget_tweaks %}

{% block content %}

<section class="hero is-success is-fullheight">
  <div class="hero-body">
    <div class="container">
      <h1 class="title has-text-centered">
        Django Survey
      </h1>

      <div class="columns">
        <div class="column is-offset-2 is-8">
          <h2 class="subtitle">
            Login
          </h2>

          <form action="{% url 'login' %}" method="POST">
            {% csrf_token %}

            <div class="field">
              <label for="{{ form.username.id_for_label }}" class="label">
                Username
              </label>
              <div class="control">
                {{ form.username|add_class:"input" }}
              </div>
              <p class="help is-danger">{{ form.username.errors }}</p>
            </div>

            <div class="field">
              <label for="{{ form.password.id_for_label }}" class="label">
                Password
              </label>
              <div class="control">
                {{ form.password|add_class:"input" }}
              </div>
              <p class="help is-danger">{{ form.password.errors }}</p>
            </div>

            <div class="field">
              <div class="control">
                <button class="button is-link">Submit</button>
              </div>
            </div>
          </form>
          <hr>
          <label for="" class="label">Or login with Google</label>
          <div class="field">
            <div class="control">
              <a href="{% url 'social:begin' 'google-oauth2' %}" class="button">
                <span class="icon">
                  <i class="	fab fa-google-plus-g"></i>
                </span>
                <span>Google</span>
              </a>
            </div>
          </div>
        </div>
      </div>

    </div>
  </div>
</section>

{% endblock %}
This leaves the login page looking as follows.

And thats it.
Users can now click the Google login button which will redirect them to authenticate with Google which then redirects them back to their profile page in the Django Survey application upon successful authentication.
Want to Learn More About Python and Django?
- My go to reference book for Django is Two Scoops of Django
- Another noteable reference for Django is Django 2 Web Development Cookbook
- For general Python skills Python Tricks: A Buffet of Awesome Python Features
thecodinginterface.com earns commision from sales of linked products such as the books above. This enables providing continued free tutorials and content so, thank you for supporting the authors of these resources as well as thecodinginterface.com
Conclusion
In this article I have shown how to integrate the Python Social Auth package into a Django application to provide users a way to authenticate with Google's OAuth2. The Python Social Auth package offers backends for many popular social networking sites. The general approach varies very little amongst them so, readers should be able to use this tutorial along with the official Python Social Auth docs to use one of the others. In the next article I will be covering how to implement a email confirmation step during the registration process along with implementing password resets.
Thanks for joining along on this tour of some of the awesome authentication features that can be implemented in the Django web framework using Python. As always, don't be shy about commenting or critiquing below.