JavaFX with Gradle, Eclipse, Scene Builder and OpenJDK 11: Refactor with FXML and Scene Builder
 By
By

Introduction
In this final article of an introductory series on building desktop apps using JavaFX with Gradle, Eclipse, and Scene Builder I refactor the previously built random number generating app using FXML views along with the amazing Scene Builder design tool from Gluon. JavaFX's FXML view files provide an excellent way to separate out UI presentation from the behavior and logic coded into the controllers and models. When paired with Scene Builder the experience translates into efficient prototyping as well as full on design of UIs.
The code for the Random Number demo app is hosted on GitHub for following along and experimentation.
Series Contents
- JavaFX with Gradle, Eclipse, Scene Builder and OpenJDK 11: Project Setup
- JavaFX with Gradle, Eclipse, Scene Builder and OpenJDK 11: Java Coded Components
- JavaFX with Gradle, Eclipse, Scene Builder and OpenJDK 11: Refactor with FXML and Scene Builder (you're here)
Overview of Scene Builder
Scene Builder, as described in the Gluon Scene Builder product page, is a design tool that facilitates Drag & Drop Rapic Application Development for both Desktop and Mobile Platforms. Sounds good so far right? Best of all its completely free to use.
Back in the first post of this series I demonstrated the steps necessary to install the Eclipse JavaFX plugin as well as Gluon's Scene Builder along with how to associate the two tools but, until now I haven't really given any more mention to FXML or Scene Builder. This was intentional. I feel its important to still know how to code your own JavaFX UI nodes using pure Java code because there are times when this is necessary to apply a little extra control over a node in the scene graph. That being said, it has been my preferred approach to start by building out JavaFX UI's with FXML and Scene Builder then switch over to using Java code where it makes sense to.
Scene Builder is layed out as shown below, nicely divided into sections for selecting Scene Graph nodes and visually adding them to the FXML document. It also provides the ability for associating the FXML doc to Java coded JavaFX controllers as well as CSS stylesheets plus several other well organized sections for interacting with, designing and, configuring the UI elements.

Small Change to Gradle Build File
In order to use FXML view files within the JavaFX project I will need to pull in an additional dependency, the javafx.fxml module. The updated build.gradle file is shown below.
plugins {
    id 'eclipse'
    id 'application'
    id 'org.openjfx.javafxplugin' version '0.0.7'
}

repositories {
    mavenCentral()
}

sourceCompatibility = 11
targetCompatibility = 11

javafx {
    version = "12"
    modules = [ 'javafx.controls', 'javafx.fxml' ]
}

dependencies {
    testImplementation 'junit:junit:4.12'
}

mainClassName = "com.thecodinginterface.randomnumber.AppLauncher"
After doing this I must refresh the Gradle project in Eclipse so that it resynchronizes the dependencies.

Refactoring the FrontController and Nav Bar to use FXML
In this section I jump right into rebuilding the Random Number with FXML beginning with the FrontController and the navigable row of navbar-like toggle buttons triggering the swapping of main UI components simulating a page change.
To begin I right click on the com.thecodinginterface.randomnumber package in src/main/resources directory in Eclipse's Package (or Project) Explorer on the left and add a new package named com.thecodinginterface.randomnumber.views to hold the FXML files. Then I right click the new views package, select New > Other from the menu as seen below.

In the resulting dialog I expand the JavaFX section, select New FXML Document, and click next.

Yet another dialog appears where I name the FXML file, Base.fxml, then select BorderPane as the root node before clicking finish.

This leaves the resources directory structure of the Gradle project looking as follows in Eclipse so, now all I need is to right click the Base.fxml file and click "Open with SceneBuilder".

With Scene Builder open I select the BorderPane in the Document Hierarchy menu (bottom left) then expand the Properties section with the Inspector menu (top right) and, in the JavaFX CSS section I click the plus sign allowing me to browse to the stylesheet named styles.css.

Expanding the Code section of the Inspector menu on the right I enter the fx:id property of rootBorderPane matching the class instance field name in the FrontController. Then over in the Document menu (bottom left) within the section titled Controller I specify com.thecodinginterface.randomnumber.controllers.FrontController as the controller to be used for this FXML file.

Next in the search bar (top left) I type in HBox then select it before drag and dropping it to the TOP section of the BorderPane node in the Document Hierarchy menu (bottom left). Then with the HBox selected in the Hierarchy menu I add the CSS class name of "navbar" into the Style Class field and viola Scene Builder automatically displays the styling rules.

At this point I can search for and add a Label node to the HBox and give it the fx:id of logoLbl (again, thats in the Code section of the Inspector menu on the right side of Scene Builder). After giving it the logoLbl fxid I add it's CSS class "navbar-logo".

I continue by searching for and adding an ImageView to the logoLbl Label node then give it a fx:id of logoImgView. Next I add the two ToggleButton nodes to the HBox giving them fxids of generateNumbersBtn and viewNumbersBtn along with style classes of "navbar-btn" and text labels of "Generate Number" and "View Numbers". One last thing I forgot to mention reguarding the size of the HBox, I want to let it resize with the scene graph elemements so with the HBox selected I expand the Layout section in the Inspector menu (right side of Scene Builder) and change the width and height properties to USE_COMPUTED_SIZE (if they are not already).

I can now start changing the FrontController class to get it interacting with Base.fxml. To begin I wipe out the singleton design implementation by removing the INSTANCE class field and the private constructor and, I also remove the makeNavBar() method.
In their place I add a new method, FrontController#initialize, which is called via the JavaFX FXMLLoader class (to be introduced shortly) when loading up the FXML view file (Base.fxml). In addition to the initialize method I add new class instance fields matching the fxid values in Base.fxml.
A quick productivity tip, you can click the main View menu of Scene Builder then click Show Sample Controller Skeleton and grab all the class field nodes' fxid values you defined in the Code section of the Inspector menu

Below is the updated FrontController at this point.
// FrontController.java

package com.thecodinginterface.randomnumber.controllers;

import java.net.URL;

import com.thecodinginterface.randomnumber.RandomNumberApp;
import com.thecodinginterface.randomnumber.repository.RandomNumberDAO;

import javafx.fxml.FXML;
import javafx.scene.Scene;
import javafx.scene.control.Label;
import javafx.scene.control.ToggleButton;
import javafx.scene.control.ToggleGroup;
import javafx.scene.image.ImageView;
import javafx.scene.layout.BorderPane;
import javafx.stage.Stage;

public class FrontController {
    public static final double APP_WIDTH = 500;
    public static final double APP_HEIGHT = 350;

    private RandomNumberDAO randomNumberDAO;

    private Stage primaryStage;

    @FXML
    private BorderPane rootBorderPane;

    @FXML
    private Label logoLbl;

    @FXML
    private ImageView logoImgView;

    @FXML
    private ToggleButton generateNumbersBtn;

    @FXML
    private ToggleButton viewNumbersBtn;

    public void initialize() {

    }

    public void setStage(Stage primaryStage) {
        this.primaryStage = primaryStage;
        var scene = new Scene(rootBorderPane, APP_WIDTH, APP_HEIGHT);
        URL url = RandomNumberApp.class.getResource("styles/styles.css");
        scene.getStylesheets().add(url.toExternalForm());
        this.primaryStage.setScene(scene);
    }

    public void setRandomNumberDAO(RandomNumberDAO randomNumberDAO) {
        this.randomNumberDAO = randomNumberDAO;
    }

    public RandomNumberDAO getRandomNumberDAO() {
        return randomNumberDAO;
    }

    public void showNumberGeneratorView() {
        updateContent(new NumberGeneratorController());
    }

    public void showNumbersListView() {
        updateContent(new NumbersViewController());
    }

    private void updateContent(BaseController ctrl) {
        ctrl.setFrontController(this);
        rootBorderPane.setCenter(ctrl.getContentPane());
    }

    public void showStage() {
        if (!primaryStage.isShowing()) {
            primaryStage.show();
        }
    }
}
Now I focus my attention on the initialize method which is where I place code for wiring up click event handlers, attch the ToggleButton buttons to their ToggleGroup and, load the TCI logo into the logoLbl Label node. I should mention that you can do some of this with Scene Builder but, I like to still handle some things in Java code.
public void initialize() {
    var toggleGroup = new ToggleGroup();
    generateNumbersBtn.setToggleGroup(toggleGroup);
    viewNumbersBtn.setToggleGroup(toggleGroup);
    generateNumbersBtn.setSelected(true);

    generateNumbersBtn.setOnAction(evt -> showNumberGeneratorView());
    viewNumbersBtn.setOnAction(evt -> showNumbersListView());

    logoImgView.setImage(new Image(
        RandomNumberApp.class.getResourceAsStream("images/TCI-Logo.png")
    ));
    logoImgView.setPreserveRatio(true);
    logoImgView.setFitWidth(58);
}
To put the new FXML / FrontController pairing to use I need to make a couple small changes in RandomNumberApp.java by utilizing the FXMLLoader class to load the Base.fxml file as well as fetch an instance of the FrontController class previously done via the singleton pattern.
// RandomNumberApp.java

package com.thecodinginterface.randomnumber;

import java.io.IOException;

import com.thecodinginterface.randomnumber.controllers.FrontController;
import com.thecodinginterface.randomnumber.repository.LocalRandomNumberDAO;
import com.thecodinginterface.randomnumber.repository.RandomNumberDAO;

import javafx.application.Application;
import javafx.application.Platform;
import javafx.fxml.FXMLLoader;
import javafx.stage.Stage;

public class RandomNumberApp extends Application {

    @Override
    public void start(Stage stage) {
        // Leaving this line for reference
        // FrontController frontController = FrontController.getInstance();

        var fxmlLoader = new FXMLLoader(getClass().getResource("views/Base.fxml"));
        try {
            // load can throw an IOException if their is an issue with the FXML file
            fxmlLoader.load();
            var frontController = (FrontController) fxmlLoader.getController();
            frontController.setStage(stage);
            RandomNumberDAO randomNumberDAO = new LocalRandomNumberDAO();
            randomNumberDAO.loadNumbers();
            frontController.setRandomNumberDAO(randomNumberDAO);
            frontController.showNumberGeneratorView();
            frontController.showStage();
        } catch (IOException e) {
            e.printStackTrace();
            Platform.exit();
        }
    }

    public static void main(String[] args) {
        launch();
    }
}
Now if I kick off my Gradle run task for the randomnumber project I see everything looks just like it did before only now I'm utilizing FXML to instantiate the root BorderPane and navbar like HBox header section.

Refactoring Number Generator View to FXML
With the FrontController now utilizing FXML for the root BorderPane node and the navbar I can begin in on the refactor of the Number Generator view. Again, I add a new FXML file named, NumberGenerator.fxml, to the views resource package but, this time I leave AnchorPane as the root node.

I open the file in Scene Builder from within Eclipse by right clicking on the NumberGenerator.fxml file and selecting "Open with SceneBuilder". First I select the AnchorPane root node and add the styles.css stylesheet to it just like the last section. Moving on I add a StackPane to the root node AnchorPane then I expand the Layout section of the Inspector menu on the right and anchor the StackPane 10 pixels from the edges of the root node.

Next I add a VBox to the StackPane. Following that I add an HBox to the top section of the VBox and a GridPane beneath it but, still in the VBox. With these added I select the StackPane from the Document Hierarchy, expand the Properties submenu in the Inspector and set the Alignment to CENTER (I do the same for the VBox, HBox, and GridPane just added also).

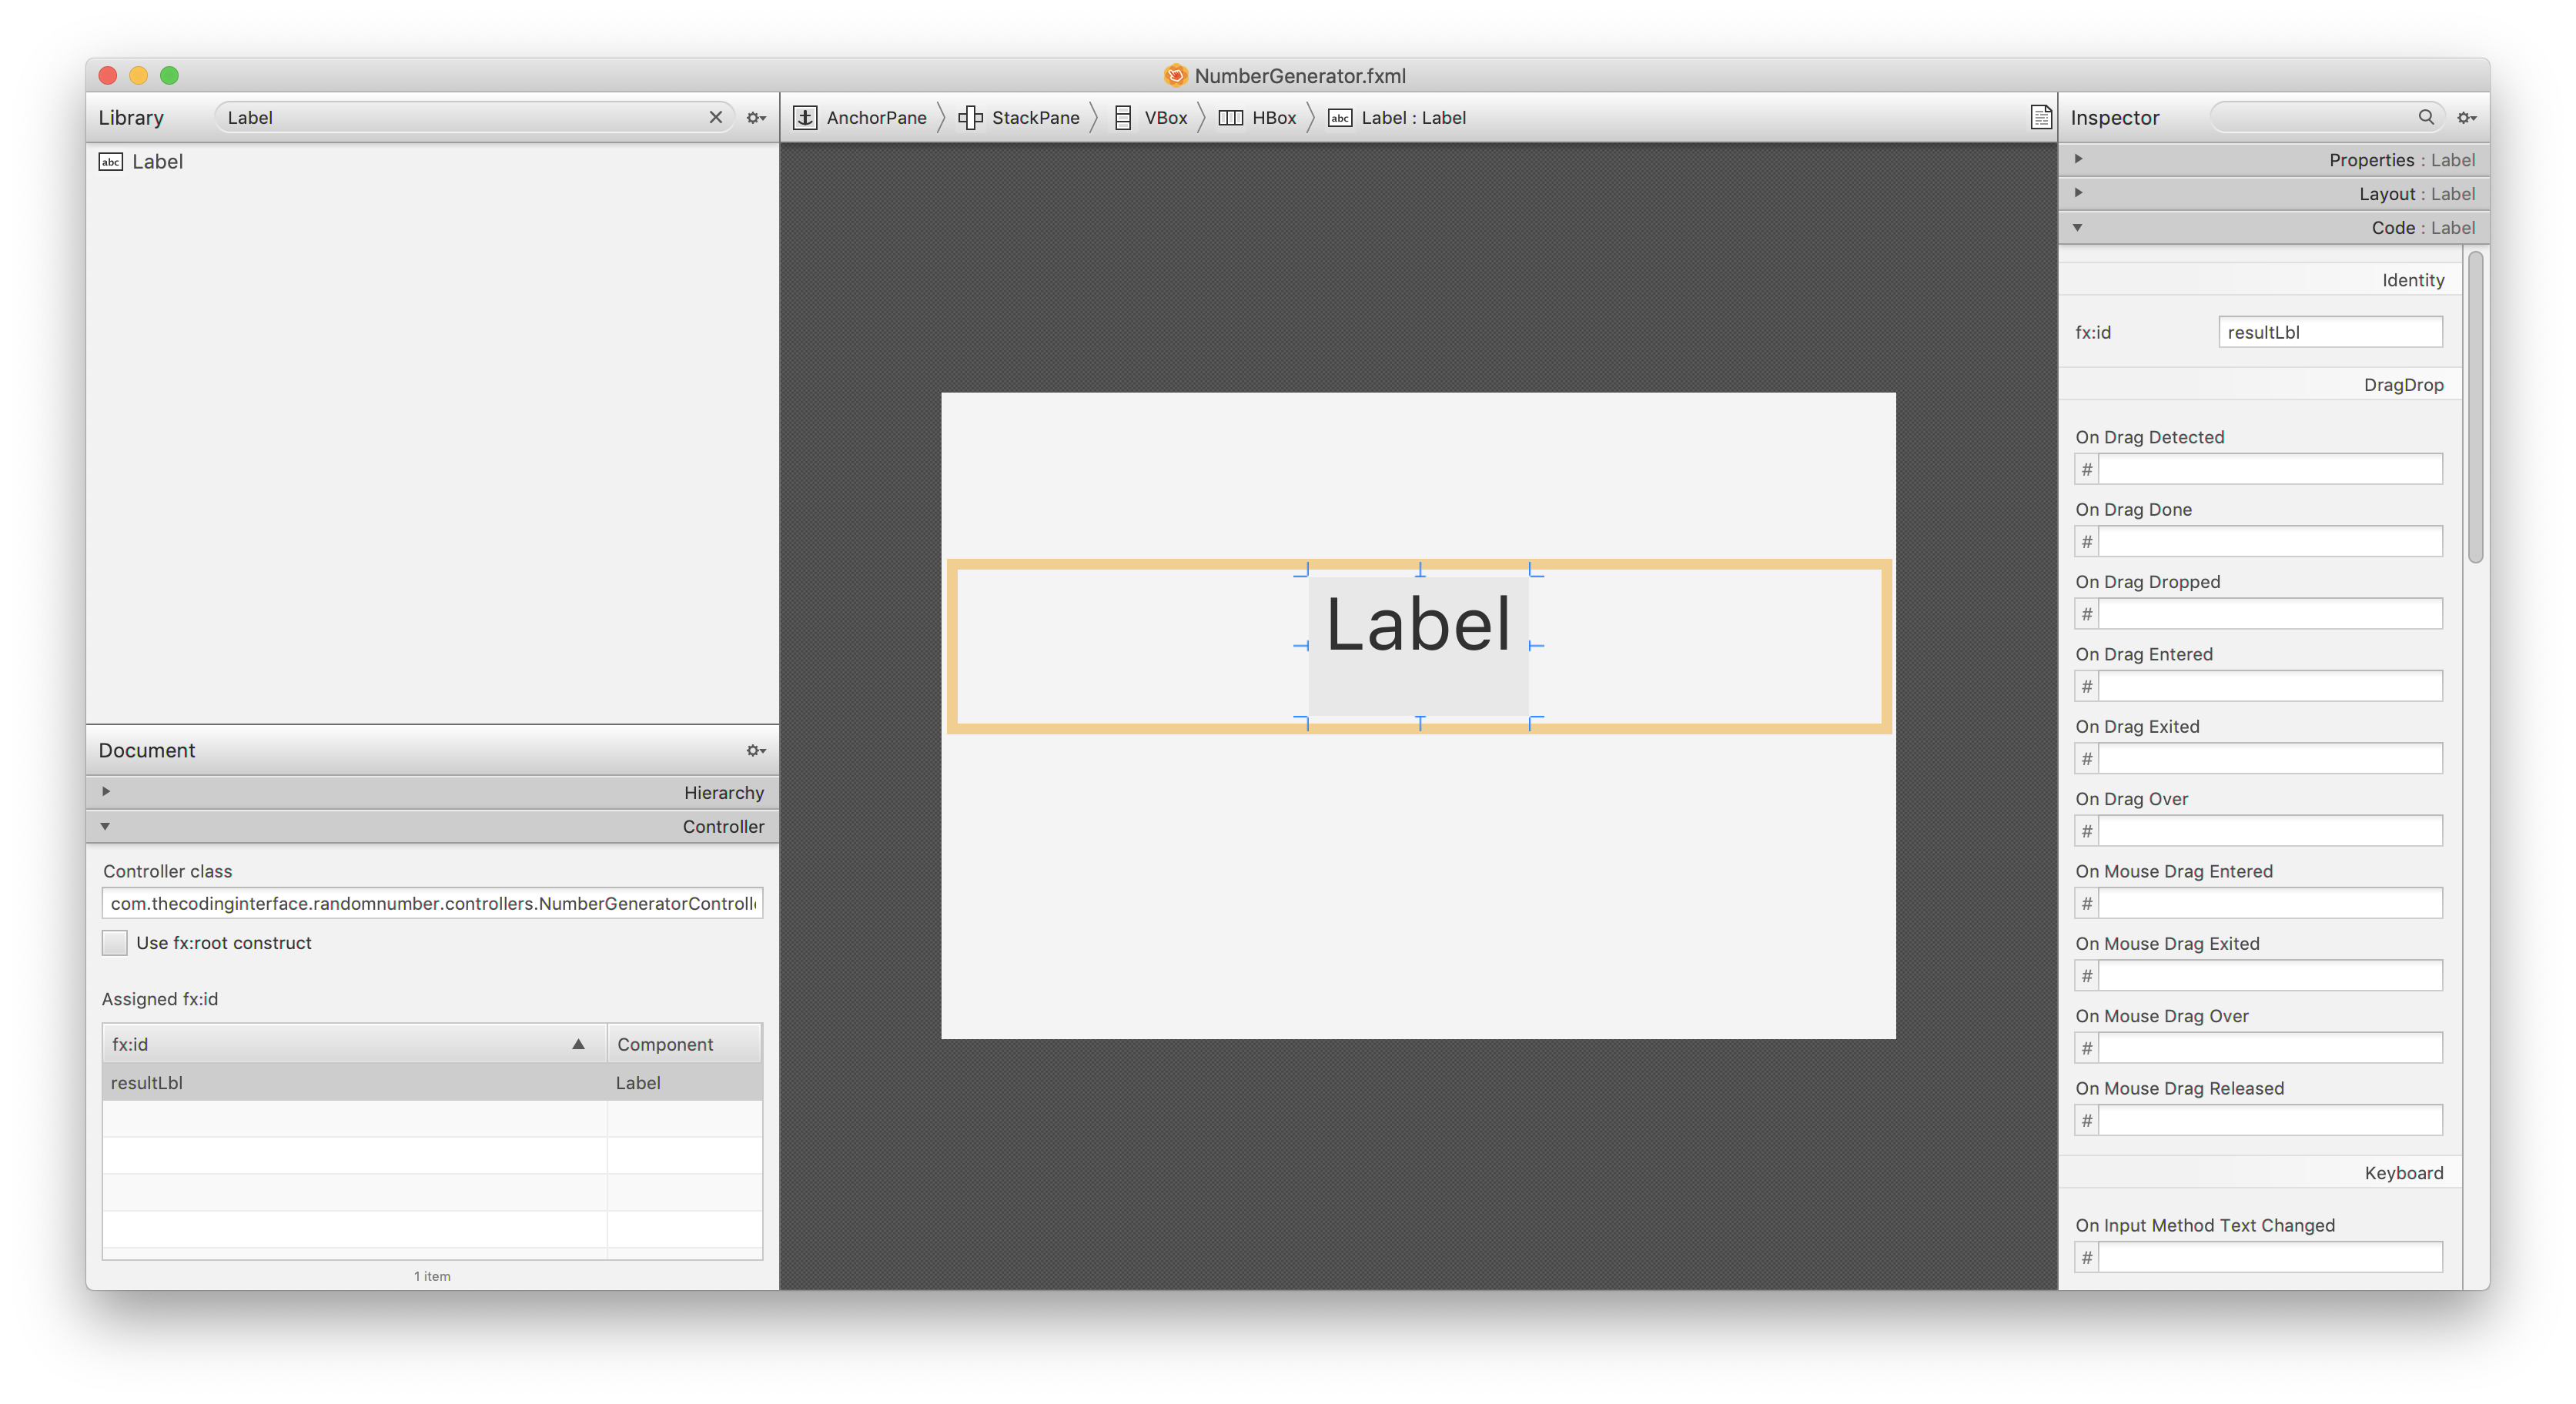
After that I add a Label node to the HBox and give it a fx:id of resultLbl along with a CSS style class of "result-label". I also associate the controller, com.thecodinginterface.randomnumber.controllers.NumberGeneratorController, to the NumberGenerator.fxml file within the Document menu.
Moving on I can start modifying the GridPane by adding labels to the first column, giving them the text of "Min Value" and "Max Value". Next I add their associated TextField inputs in the second column giving them fx:id values of minValTextField and maxValTextField. Then selecting the GridPane from the Document Hierarchy and expanding the Layout section of the Inspector menu I enter 10 for both the HGap and the VGap to nicely space the rows and columns.

Lastly, I add a ButtonBar with two buttons in it to the the 0th column and 2nd row indexes. I update the text of the buttons to "Generate Number" and "Clear" then give them fx:id values of resultBtn and clearBtn. I select the ButtonBar node from the Document Hierarchy and over in the Layout section of the Inspector I change the column span value from 1 to 2 and set the HAlignment to Center. I can also move around the columns until I reach the layout of my liking.

I again use the Scene Builder View menu's Show Sample Controller Skeleton feature to copy over the FXML node's that need to live in the NumberGeneratorController class and add an initialize method to it. I also clear out the code in the getContentPane as I'll now be gaining access to the root AnchorPane node via the FXMLLoader.
package com.thecodinginterface.randomnumber.controllers;

import javafx.fxml.FXML;
import javafx.scene.control.Button;
import javafx.scene.control.Label;
import javafx.scene.control.TextField;
import javafx.scene.layout.AnchorPane;

public class NumberGeneratorController extends BaseController {
    private static final String NUMBER_PLACEHOLDER = "###";


    @FXML
    private Label resultLbl;

    @FXML
    private TextField minValueTextField;

    @FXML
    private TextField maxValTextField;

    @FXML
    private Button resultBtn;

    @FXML
    private Button clearBtn;

    public void initialize() {

    }

    // I'll remove this from BaseController after the NumbersViewController is refactored
    @Override
    AnchorPane getContentPane() {
        return null;
    }
}
In the same way that was done with the FrontController and Base.fxml refactor I place setup code inside the NumberGeneratorController#initialize method that is called when loading the GenerateNumber.fxml file using the FXMLLoader class. This way of doing things provides a nice separation between the UI specified largely in the FXML file and the behavior I'm about to equip the Controller with.
Inside the initialize method I set the default value of the resultLbl Label node to the NUMBER_PLACEHOLDER constant field. I also place a validation constraint on it's Button#disableProperty field so it is only clickable if the text fields have input in them. I similarly reuse the previously coded up button ActionEvent handlers to parse the min and max values from the text inputs into integers and, use them to generate the bounded random number which is then saved as an instance of RandomNumber to the abstracted storage location using the RandomNumberDAO class. The clear button, well ... you guessed it, clears the inputs.
public void initialize() {
    resultLbl.setText(NUMBER_PLACEHOLDER);

    resultBtn.disableProperty().bind(
            minValTextField.textProperty().isEmpty().or(
                    maxValTextField.textProperty().isEmpty())
    );

    resultBtn.setOnAction(evt -> {
          int lowerBounds = 0;
          int upperBounds = 1;
          try {
              lowerBounds = Integer.valueOf(minValTextField.getText());
              upperBounds = Integer.valueOf(maxValTextField.getText());
          } catch (NumberFormatException e) {
              e.printStackTrace();
          }

          int number = RandomNumberUtils.boundedRandomNumber(lowerBounds, upperBounds);
          var randomNumber = new RandomNumber(
                  LocalDate.now(),
                  number,
                  lowerBounds,
                  upperBounds
          );
          if (frontController.getRandomNumberDAO().save(randomNumber)) {
              resultLbl.setText(String.valueOf(number));
          }
    });

    clearBtn.setOnAction(evt -> {
        minValTextField.setText(null);
        maxValTextField.setText(null);
        resultLbl.setText(NUMBER_PLACEHOLDER);
    });
}
Now to put those changes into action I need to change the way the FrontController#showNumberGeneratorView method works. To begin I clear out the existing implementation then start by creating an instance of FXMLLoader passing it's constructor a URL object pointing to the NumberGenerator.fxml file. Then I use the FXMLLoader instance to load the FXML file which returns the root AnchorPane node as an Object that I type cast to it's true AnchorPane type. I also use the FXMLLoader instance to fetch the NumberGeneratorController instance which again needs type cast to it's true type. Once done I can use it to set the instance of FrontController I'm working in. Lastly, I set the center component of the FrontController's BorderPane to the just loaded AnchorPane instance.
public void showNumberGeneratorView() {
    var fxmlLoader = new FXMLLoader(RandomNumberApp.class.getResource("views/NumberGenerator.fxml"));
    try {
    	  // load can throw an IOException if their is an issue with the FXML file
        var anchorPane = (AnchorPane) fxmlLoader.load();
        var ctrl = (NumberGeneratorController) fxmlLoader.getController();
        ctrl.setFrontController(this);
        rootBorderPane.setCenter(anchorPane);
    } catch (IOException e) {
        e.printStackTrace();
    }
}
And behold, the random number generatoring view is refactored!
Refactoring Numbers List View to FXML
Only one more view left to refactor now, the numbers list view. Just like before, I add a new FXML file inside the com.thecodinginterface.randomnumber.views package named NumbersView.fxml. Similarly, I add the styles.css stylesheet to the root AnchorPane node and configure it to use the com.thecodinginterface.randomnumber.controllers.NumbersViewController class. Following that I add a StackPane to the Anchor pane and anchor it 10 pixels from all sides of the AnchorPane.

I then add a VBox node to the StackPane and center align it then follow that by adding the TableView to the VBox. By default the TableView will have two columns so, I right click one of them and duplicate it twice giving me the four columns I need in the UI.

Next I update the Column headers to their appropiate names of "Number", "Min Value", "Max Value" and, "Created" then selecting the TableView node in the Document Hierarchy and expanding the Properties section under the Inspector menu I change the Column Resizing dropdown to constrained-resize.

Thats about it for designing the FXML UI. All that remains is to give the TableView and TableColumn columns fx:id values so they can be interacted with in the NumbersViewController which are table for the TableView node and numberColumn, lowerBoundsColumn, upperBoundsColumn and, createdAtColumn for the TableColumn nodes.

If I again take a peak at the Scene Builder Sample Controller Skeleton (View -> Show Sample Controller Skeleton) I see the class member fields are all Generically typed so, all that remains are to fill in the type parameters just as they were in the previous version.

The NumbersViewController is updated with the fields shown in the Sample Skeleton along with an initialize method that gives the TableColumn instances cell value factories just as was done in the earlier version (previous article). The one new thing to mention is that I have overriden the BaseController#setFrontController method to fetch the list of RandomNumber objects, convert them to RandomNumberViewModel instances and wrapped them in an ObservableList<RandomNumberViewModel> collection before finally loading them into the table via TableView#setItems
package com.thecodinginterface.randomnumber.controllers;

import java.time.LocalDate;
import java.util.List;
import java.util.stream.Collectors;

import com.thecodinginterface.randomnumber.viewmodels.RandomNumberViewModel;

import javafx.collections.FXCollections;
import javafx.fxml.FXML;
import javafx.scene.control.TableCell;
import javafx.scene.control.TableColumn;
import javafx.scene.control.TableView;
import javafx.scene.layout.AnchorPane;

public class NumbersViewController extends BaseController {

    @FXML
    private TableView<RandomNumberViewModel> table;

    @FXML
    private TableColumn<RandomNumberViewModel, Integer> numberColumn;

    @FXML
    private TableColumn<RandomNumberViewModel, Integer> lowerBoundsColumn;

    @FXML
    private TableColumn<RandomNumberViewModel, Integer> upperBoundsColumn;

    @FXML
    private TableColumn<RandomNumberViewModel, LocalDate> createdAtColumn;

    public void initialize() {
        numberColumn.setCellValueFactory(cell ->
                cell.getValue().numberProperty().asObject());
        lowerBoundsColumn.setCellValueFactory(cell ->
                cell.getValue().lowerBoundsProperty().asObject());
        upperBoundsColumn.setCellValueFactory(cell ->
                cell.getValue().upperBoundsProperty().asObject());
        createdAtColumn.setCellValueFactory(cell ->
                cell.getValue().createdAtProperty());

        createdAtColumn.setCellFactory(column -> {
            return new TableCell<RandomNumberViewModel, LocalDate>() {
                @Override
                public void updateItem(final LocalDate item, boolean empty) {
                    if (item == null || empty) {
                        setText(null);
                    } else {
                        setText(RandomNumberViewModel.formatDate(item));
                    }
                }
            };
        });
    }

    @Override
    public void setFrontController(FrontController ctrl) {
        super.setFrontController(ctrl);
        List<RandomNumberViewModel> numbers = frontController.getRandomNumberDAO()
              .getNumbers()
              .stream()
              .map(RandomNumberViewModel::new)
              .collect(Collectors.toList());
        table.setItems(FXCollections.observableArrayList(numbers));
    }

    @Override
    AnchorPane getContentPane() {

        return null;
    }
}
Following the same pattern as previously shown I update the FrontController#showNumbersListView to load the FXML file, fetch it's controller before giving it the instance of FrontController and setting the root AnchorPane to the FrontController BorderPane's center section like so.
// FrontController.java

package com.thecodinginterface.randomnumber.controllers;

import java.io.IOException;
import java.net.URL;

import com.thecodinginterface.randomnumber.RandomNumberApp;
import com.thecodinginterface.randomnumber.repository.RandomNumberDAO;

import javafx.fxml.FXML;
import javafx.fxml.FXMLLoader;
import javafx.scene.Scene;
import javafx.scene.control.Label;
import javafx.scene.control.ToggleButton;
import javafx.scene.control.ToggleGroup;
import javafx.scene.image.Image;
import javafx.scene.image.ImageView;
import javafx.scene.layout.AnchorPane;
import javafx.scene.layout.BorderPane;
import javafx.stage.Stage;

public class FrontController {
    public static final double APP_WIDTH = 500;
    public static final double APP_HEIGHT = 350;

    private RandomNumberDAO randomNumberDAO;

    private Stage primaryStage;

    @FXML
    private BorderPane rootBorderPane;

    @FXML
    private Label logoLbl;

    @FXML
    private ImageView logoImgView;

    @FXML
    private ToggleButton generateNumbersBtn;

    @FXML
    private ToggleButton viewNumbersBtn;

    public void initialize() {
        var toggleGroup = new ToggleGroup();
        generateNumbersBtn.setToggleGroup(toggleGroup);
        viewNumbersBtn.setToggleGroup(toggleGroup);
        generateNumbersBtn.setSelected(true);

        generateNumbersBtn.setOnAction(evt -> showNumberGeneratorView());
        viewNumbersBtn.setOnAction(evt -> showNumbersListView());

        logoImgView.setImage(new Image(
            RandomNumberApp.class.getResourceAsStream("images/TCI-Logo.png")
        ));
        logoImgView.setPreserveRatio(true);
        logoImgView.setFitWidth(58);
    }

    public void setStage(Stage primaryStage) {
        this.primaryStage = primaryStage;
        var scene = new Scene(rootBorderPane, APP_WIDTH, APP_HEIGHT);
        URL url = RandomNumberApp.class.getResource("styles/styles.css");
        scene.getStylesheets().add(url.toExternalForm());
        this.primaryStage.setScene(scene);
    }

    public void setRandomNumberDAO(RandomNumberDAO randomNumberDAO) {
        this.randomNumberDAO = randomNumberDAO;
    }

    public RandomNumberDAO getRandomNumberDAO() {
        return randomNumberDAO;
    }

    public void showNumberGeneratorView() {
        var fxmlLoader = new FXMLLoader(RandomNumberApp.class.getResource("views/NumberGenerator.fxml"));
        try {
            var anchorPane = (AnchorPane) fxmlLoader.load();
            var ctrl = (NumberGeneratorController) fxmlLoader.getController();
            ctrl.setFrontController(this);
            rootBorderPane.setCenter(anchorPane);
        } catch (IOException e) {
            e.printStackTrace();
        }
    }

    public void showNumbersListView() {
        var fxmlLoader = new FXMLLoader(RandomNumberApp.class.getResource("views/NumbersView.fxml"));
        try {
            var anchorPane = (AnchorPane) fxmlLoader.load();
            var ctrl = (NumbersViewController) fxmlLoader.getController();
            ctrl.setFrontController(this);
            rootBorderPane.setCenter(anchorPane);
        } catch (IOException e) {
            e.printStackTrace();
        }
    }

    public void showStage() {
        if (!primaryStage.isShowing()) {
            primaryStage.show();
        }
    }
}

Resources to Learn More About Java and JavaFX
- This book is an easy read and great for getting up to speed with JavaFX quickly Introducing JavaFX 8 Programming (Oracle Press)
- I'm a big fan of the Murach books on programming because they do a great job of striking a balance between lots of code samples and short, to the point explanations, and Murach's Java Programming (5th Edition) has been a good reference for me.
- When it comes to best practices in Java, Effective Java, 3rd Ed is unparalleled
- Looking to learn or get refreshed on Java quickly? Have a look at my article High-Level Introduction to Java for Developers
Conclusion
This post concludes the introductory series on how to get setup and developing JavaFX desktop applications with OpenJDK 11+ using the Eclipse integrated development environment, Gradle build system, and Gluon Scene Builder design tool. I have tried to be intentional in writing this in a way that someone unfamilar with the tools (Gradle, Eclipse, Scene Builder) can easily follow along but, at the same time use semantics and design principles Java (or perhaps other OOP languages) developers will recognize and appreciate.
As always, thanks for reading and don't be shy about commenting or critiquing below.