Terraform for EC2 and Elastic Block Storage: Provisioning, Attaching and Mounting EBS on Linux
 By
By
Introduction
In this article I demonstrate how to provision Linux based EC2 Virtual Private Servers along with Elastic Block Storage (EBS) Volumes using Terraform. Then I complete the use case by demonstrating how to mount the EBS volume devices on Linux XFS filesystems.
Project Setup
If you haven't already done so please install Terraform on your system as described in the Terraform Docs. You will also want to install the AWS CLI following the AWS CLI Docs as well.
Once you have both CLI tools installed you can move on to setting up the initial boilerplate files for the directory which will hold the necessary Terraform and unix scripts for this tutorial. Start by creating a directory named something like ec2-ebs then create two files in the directory: main.tf and bootstrap.sh
Your directory structure and files should look as shown below.
ec2-ebs/
├── bootstrap.sh
└── main.tf
Inside the main.tf Terraform file sections for Variables, Providers, Data, Resources and Outputs. Add AWS region and AWS CLI profile name variables then specify the AWS provider and use the variables for region and profile as shown below.
# main.tf

####################################################
# Variables
####################################################
variable "region" {
  default = "us-east-2"
}

variable "profile" {
  default = "default"
}


####################################################
# Providers
####################################################
provider "aws" {
  region  = var.region
  profile = var.profile
}


####################################################
# Data
####################################################
data "aws_availability_zones" "azs" {}


####################################################
# Resources
####################################################


####################################################
# Outputs
####################################################
Note that I've also specified a data resource for the availability zones in the given region specified in the AWS Provider.
Before moving on I initialize the project directory like so.
terraform initThere are two more things I would like to accomplish before concluding this setup section, both will involve retrieving information from the AWS Management Console.
It's likely you already have a local SSH Key Pair from deploying other EC2 instances but, if you don't you can sign into the console and get one to use. Once in the AWS Console simply search for Key Pair in the search bar while selecting the region where the resources will be deployed.
Click the Create Key Pair button.

Give it a name and select either pem or ppk depending on if you will be using an Open SSH or PuTTY based client and click Create key pair then save the file when prompted.

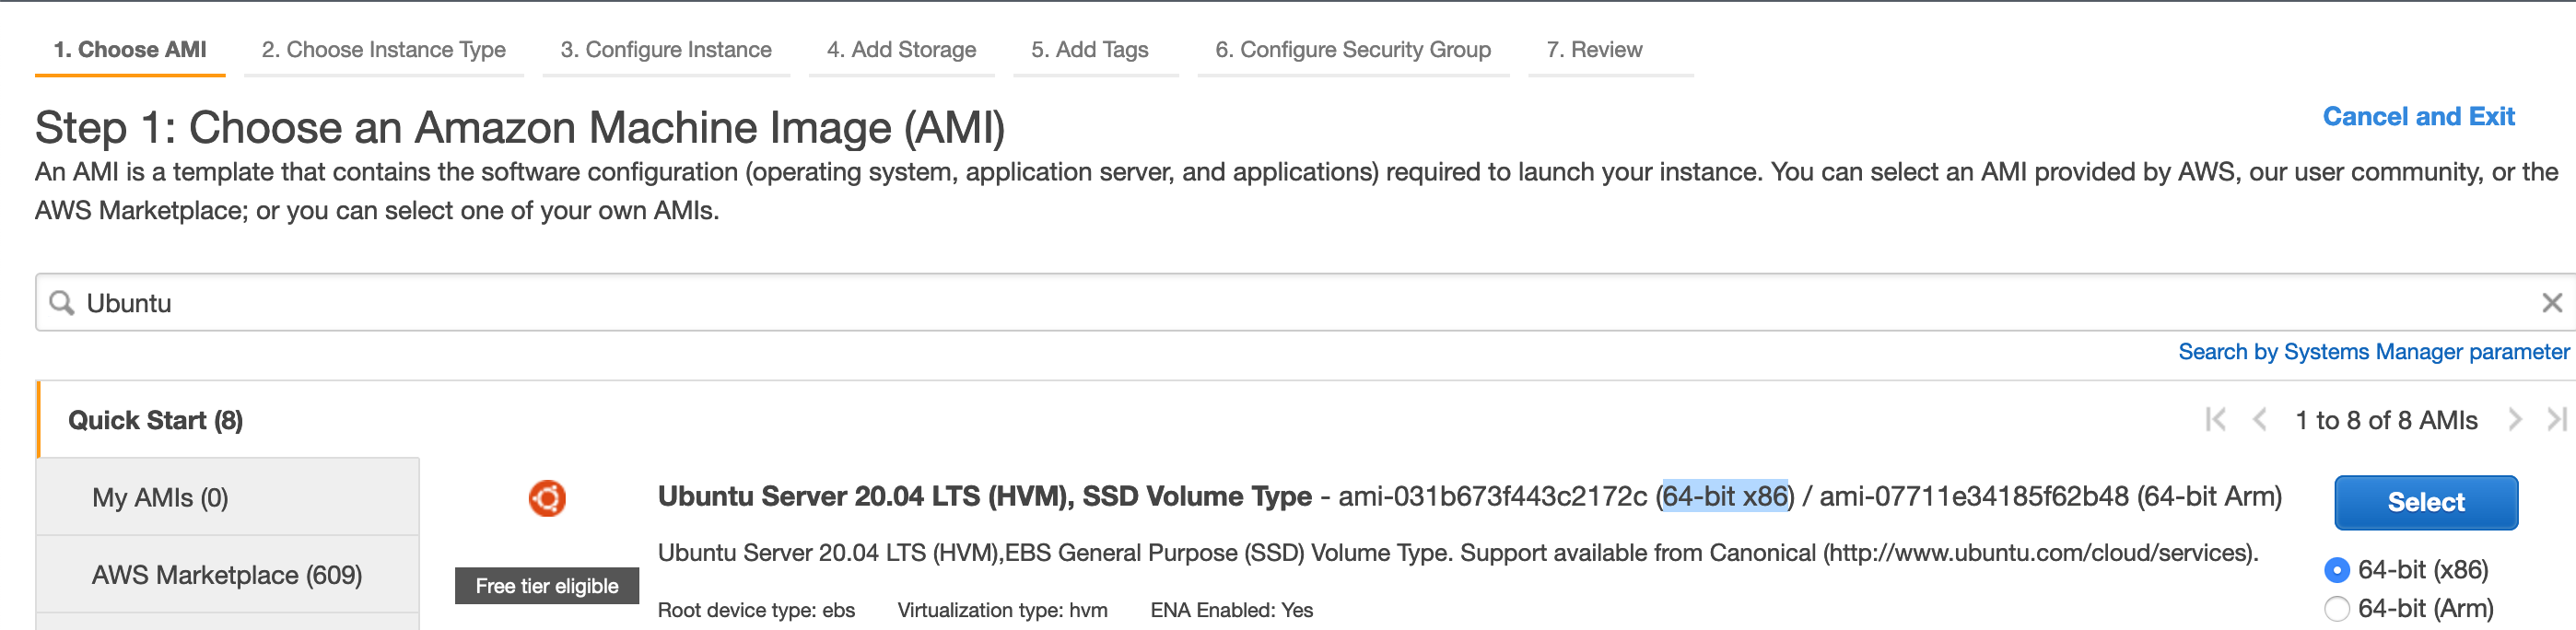
Next I need to grab a Linux AMI ID to use for specify the exact type of Image to deploy the EC2 instance. Again, I search for EC2 in the search bar then click it to go to the EC2 Dashboard where I then click Launch Instance button.

This takes me to the Amazon Machine Image selection page where I can search for a particular Linux distribution's AMI such as Ubuntu Server 20.04 LTS like shown below. I can then copy the AMI ID for the 64-bit x86 architecture (ami-08962a4068733a2b6 for this example in us-east-2 region).
Defining the Infrastructure with Terraform
For this tutorial I am utilizing the AWS VPC Terraform module to make specifying a VPC to deploy the EC2 instances and EBS Volumes within a two subnet network, both publically available. Below I've specified three new variables within the main.tf file for a VPC CIDR range, the two subnet CIDR ranges for the subnets within the VPC CIDR and another CIDR for specifying an acceptable external CIDR network which I'll allow to connect to the EC2 instances to be provisioned. For the sake of this tutorial I will just leave the external CIDR wide open.
# main.tf

####################################################
# Variables
####################################################
variable "region" {
  default = "us-east-2"
}

variable "profile" {
  default = "default"
}

variable "vpc_cidr" {
  default = "10.192.0.0/16"
}

variable "dev_cidrs" {
  type    = ["0.0.0.0/0"]
}

variable "public_subnets" {
  default = ["10.192.10.0/24", "10.192.20.0/24"]
}

# ... omitting the rest for brevity
Next in the Resources section I implement the VPC module feeding it the VPC CIDR and Subnet CIDRs. After the VPC module definition I define a security group to be used with the EC2 instances which allows for connecting via SSH from the specified external development network CIDR.
# main.tf
... skipping down to resources section

####################################################
# Resources
####################################################

module "vpc" {
  source  = "terraform-aws-modules/vpc/aws"
  version = "2.77.0"

  name = "ec2-ebs-volume-demo"
  cidr = var.vpc_cidr

  azs            = slice(data.aws_availability_zones.azs.names, 0, 2)
  public_subnets = var.public_subnets

  tags = {
    Name = "ec2-ebs-volume-demo"
  }
}

resource "aws_security_group" "ssh" {
  name        = "ssh-sg"
  description = "For SSH Connections to EC2"
  vpc_id      = module.vpc.vpc_id

  ingress {
    description       = "Allow SSH Connections"
    from_port         = 22
    to_port           = 22
    protocol          = "tcp"
    cidr_blocks       = var.dev_cidrs
  }

  egress {
    from_port   = 0
    to_port     = 0
    protocol    = "-1"
    cidr_blocks = ["0.0.0.0/0"]
  }
}
Now I can move on to defining a single EC2 instance along with a single EBS volume and attachment. First I complete the remaining variables to be used to specify the ami for the AMI I selected in the AWS Console earlier, add an instance type variable, the name of the key pair to be used, along with an EBS volume device name. Below I've listed the full variables section for the main.tf file.
####################################################
# Variables
####################################################
variable "region" {
  default = "us-east-2"
}

variable "profile" {
  default = "default"
}

variable "vpc_cidr" {
  default = "10.192.0.0/16"
}

variable "dev_cidrs" {
  type    = ["0.0.0.0/0"]
}

variable "public_subnets" {
  default = ["10.192.10.0/24", "10.192.20.0/24"]
}

variable "ami" {
  # this is for Ubuntu 20.04 LTS in us-east-2 region
  default = "ami-08962a4068733a2b6"
}

variable "instance_type" {
  default = "t3.small"
}

variable "key_name" {
  default = "ec2-ebs-demo"
}

variable "ebs_att_device_name" {
  default = "/dev/sdd"
}
A word of warning here. For some instance types such as the Nitro based t3.small instance type being used here the OS and device driver will actually rename it as described in this AWS doc on Device Naming.
Next I specify the EC2 aws_instance resource, the EBS aws_ebs_volume resource, and Attachment aws_volume_attachment resource beneath the VPC and Security group resources. Note that the EC2 resource utilizes the previously defined security group and VPC module's subnets. Then the EBS volume resource uses the EC2 resource to specify the Availability Zone where it should be provisioned along with a size of 10 GB and, not explicitly stated but by default this will be a solid state GP2 storage type. The Attachment resource provides the linkage between the EBS volume and the EC2 resources.
# main.tf

... skipping down the end of the resources section

resource "aws_instance" "single_ec2" {
  key_name      = var.key_name
  ami           = var.ami
  instance_type = var.instance_type

  vpc_security_group_ids = [
    aws_security_group.ssh.id
  ]
  subnet_id = module.vpc.public_subnets[0]

  root_block_device {
    volume_size    = 8
    volume_type    = "gp2"
  }

  tags = {
    Name = "ec2-ebs-demo"
  }
}

resource "aws_ebs_volume" "single_ec2_ebs" {
  availability_zone = aws_instance.single_ec2.availability_zone
  size              = 10
  tags = {
    Name = "ec2-ebs-single-demo"
  }
}

resource "aws_volume_attachment" "single_ec2_ebs_att" {
  device_name  = var.ebs_att_device_name
  volume_id    = aws_ebs_volume.single_ec2_ebs.id
  instance_id  = aws_instance.single_ec2.id
  force_detach = true
}
These are all the Terraform resource definitions needed to provision an Ubuntu Linux EC2 instance along with a secondary EBS volume storage device.
For variety I will next demonstrate how to provision multiple sets of these resource, specifically one for each of the two subnets being provisioned. This is actually quite simple to accomplish with Terrafom's count meta argument. I've also included outputs for the public IP addresses for each EC2 instance being deployed.
# main.tf

... skipping down the end of the resources section

resource "aws_instance" "multi_ec2" {
  count         = length(var.public_subnets)
  depends_on    = [ module.vpc ]
  key_name      = var.key_name
  ami           = var.ami
  instance_type = var.instance_type

  vpc_security_group_ids = [
    aws_security_group.ssh.id
  ]
  subnet_id = module.vpc.public_subnets[count.index]

  root_block_device {
    volume_size   = 8
    volume_type   = "gp2"
  }

  tags = {
    Name = "ec2-ebs-demo"
  }
}


resource "aws_ebs_volume" "multi_ec2_ebs" {
  count             = length(var.public_subnets)
  availability_zone = aws_instance.multi_ec2[count.index].availability_zone
  size              = 10
  tags = {
    Name = "ec2-ebs-single-demo"
  }
}

resource "aws_volume_attachment" "multi_ec2_ebs_att" {
  count        = length(var.public_subnets)
  device_name  = var.ebs_att_device_name
  volume_id    = aws_ebs_volume.multi_ec2_ebs[count.index].id
  instance_id  = aws_instance.multi_ec2[count.index].id
  force_detach = true
}

####################################################
# Outputs
####################################################

output "public_subnets" {
  value = module.vpc.public_subnets
}

output "ec2_single_public_ip" {
  value = aws_instance.single_ec2.public_ip
}

output "multi_ec2_public_ips" {
  value = aws_instance.multi_ec2[*].public_ip
}
Now all that remains is to create the Terraform plan and Apply it.
The following command creates the Terraform plan and saves it to a file named ec2-ebs.tfplan
terraform plan -out "ec2-ebs.tfplan"The next command applies the Terraform plan thus provisioning the resources in the AWS Cloud.
terraform apply "ec2-ebs.tfplan"This produces output similar to what is shown below.
Outputs:

ec2_single_public_ip = "3.14.253.22"
multi_ec2_public_ips = [
  "3.142.136.1",
  "3.17.9.242",
]
public_subnets = [
  "subnet-0ef4a273c286194a8",
  "subnet-03958189dffcb2379",
]
Mounting EBS Device on Linux
Now that I have successfully deployed a few EC2 instances and EBS volumes attached to them I can SSH onto one and work through the commands needed to mount the attachable storage device.
On an Open SSH enabled computer with the PEM key downloaded previously, change the file permissions of the key to read/write for the owner only then ssh to one of the deployed EC2 instances as follows. Be sure to replace the key pair name and EC2 IP address to your specific values.
chmod 400 ec2-ebs-demo.pem
ssh ubuntu@3.14.253.22 -i ec2-ebs-demo.pem
Once on the EC2 server I update the OS packages and install xfsprogs XFS filesystem management program.
sudo apt update -y
sudo apt install xfsprogs -y
Following that I use the lsblk command to determine the device name that was selected for the attached EBS volume.
$ sudo lsblk
NAME        MAJ:MIN RM  SIZE RO TYPE MOUNTPOINT
loop0         7:0    0 33.3M  1 loop /snap/amazon-ssm-agent/3552
loop1         7:1    0 55.5M  1 loop /snap/core18/1988
loop2         7:2    0 69.9M  1 loop /snap/lxd/19188
loop3         7:3    0 31.1M  1 loop /snap/snapd/11036
nvme0n1     259:0    0    8G  0 disk
└─nvme0n1p1 259:1    0    8G  0 part /
nvme1n1     259:2    0   10G  0 disk
In this example the lsblk utility shows that the unmounted device is named nvme1n1.
Now I can use the mkfs CLI utility to make an XFS filesystem on the volume like so.
sudo mkfs -t xfs /dev/nvme1n1Following that I make a directory to mount the volume with it's new XFS filesystem to.
sudo mkdir /dataThen to mount the device volume to the directory I use the mount command as follows.
sudo mount /dev/nvme1n1 /dataOk, if I now rerun lsblk command I see that the storage device has been mounted to the /data directory.
$ sudo lsblk
NAME        MAJ:MIN RM  SIZE RO TYPE MOUNTPOINT
loop0         7:0    0 33.3M  1 loop /snap/amazon-ssm-agent/3552
loop1         7:1    0 55.5M  1 loop /snap/core18/1988
loop2         7:2    0 69.9M  1 loop /snap/lxd/19188
loop3         7:3    0 31.1M  1 loop /snap/snapd/11036
nvme0n1     259:0    0    8G  0 disk
└─nvme0n1p1 259:1    0    8G  0 part /
nvme1n1     259:2    0   10G  0 disk /data
However, this method of mounting is only temporary and will not survive a reboot. In order to make the mount to the /data directory permanent the mount configuration must be specified in the /etc/fstab config file.
Below are the initial contents of my /etc/fstab file.
$ cat /etc/fstab
LABEL=cloudimg-rootfs   /        ext4   defaults,discard        0 1
The fstab file contains information about the mounted filesystems within a Linux system specified in six fields usually separated by spaces but can be delimited by tabs as well.
- The first field specifies the device to be mounted using by name or UUID or label
- The second field represents the mounting point directory
- The third field is the filesystem type
- The fourth field is a comma separated list of mount options
- The fifth field is either a 0 or 1 and specifies whether the dump program should backup the mounted device when ran
- The sixth field should be either 1 or 2 and specifies the order of devices in which fsck should perform its checks on with the root filesystem always being 1 and others being 2
I recommend always using the devices block ID when providing entries in fstab which you can find using the blkid command like shown below and lists the EBS volume's block ID as UUID="c77a0577-7671-46c0-831b-2e231570c455".
$ sudo blkid
/dev/nvme0n1p1: LABEL="cloudimg-rootfs" UUID="7969d789-20ae-4f61-84ff-c0ac50e0dd19" TYPE="ext4" PARTUUID="8757600c-01"
/dev/loop0: TYPE="squashfs"
/dev/loop1: TYPE="squashfs"
/dev/loop2: TYPE="squashfs"
/dev/loop3: TYPE="squashfs"
/dev/nvme1n1: UUID="c77a0577-7671-46c0-831b-2e231570c455" TYPE="xfs"
The following commands will append a new line to the fstab file specifying that the EBS device is to be mounted to the /data directory as an XFS filesystem with default options and as a secondary filesystem.
BLK_ID=$(sudo blkid /dev/nvme1n1 | cut -f2 -d" ")
echo "$BLK_ID     /data   xfs    defaults   0   2" | sudo tee --append /etc/fstab
The next command is useful for verifying that mount configuration specified in fstab have proper syntax. As long as you don't get an error you are good.
sudo mount -aPulling Everything Together
Back in the Project Setup section I created a file named bootstrap.sh, in this section I am going to package the shell commands presented in the Mounting EBS Device on Linux section within the bootstrap.sh script and update the main.tf file so that it copies this bash script to the deployed EC2 instances.
Below is the updated bootstrap.sh script.
#!/bin/bash

sudo apt update -y

sudo apt install xfsprogs -y

sudo mkfs -t xfs /dev/nvme1n1

sudo mkdir /data

sudo mount /dev/nvme1n1 /data

BLK_ID=$(sudo blkid /dev/nvme1n1 | cut -f2 -d" ")

if [[ -z $BLK_ID ]]; then
  echo "Hmm ... no block ID found ... "
  exit 1
fi

echo "$BLK_ID     /data   xfs    defaults   0   2" | sudo tee --append /etc/fstab

sudo mount -a

echo "Bootstrapping Complete!"
And here is the updated main.tf Terraform file in it's entirety.
####################################################
# Variables
####################################################
variable "region" {
  default = "us-east-2"
}

variable "profile" {
  default = "default"
}

variable "vpc_cidr" {
  default = "10.192.0.0/16"
}

variable "dev_cidrs" {
  type    = "0.0.0.0/0"
}

variable "public_subnets" {
  type    = list(string)
  default = ["10.192.10.0/24", "10.192.20.0/24"]
}

variable "ami" {
  default = "ami-08962a4068733a2b6"
}

variable "instance_type" {
  default = "t3.small"
}

variable "key_name" {
  default = "ec2-ebs-demo"
}

variable "key_path" {
  default = "/path/to/ec2-ebs-demo.pem"
}

variable "ebs_att_device_name" {
  default = "/dev/sdd"
}

####################################################
# Providers
####################################################
provider "aws" {
  region  = var.region
  profile = var.profile
}


####################################################
# Data
####################################################
data "aws_availability_zones" "azs" {}


####################################################
# Resources
####################################################

module "vpc" {
  source  = "terraform-aws-modules/vpc/aws"
  version = "2.77.0"

  name = "ec2-ebs-volume-demo"
  cidr = var.vpc_cidr

  azs            = slice(data.aws_availability_zones.azs.names, 0, 2)
  public_subnets = var.public_subnets

  tags = {
    Name = "ec2-ebs-volume-demo"
  }
}

resource "aws_security_group" "ssh" {
  name        = "ssh-sg"
  description = "For SSH Connections to EC2"
  vpc_id      = module.vpc.vpc_id

  ingress {
    description       = "Allow SSH Connections"
    from_port         = 22
    to_port           = 22
    protocol          = "tcp"
    cidr_blocks       = var.dev_cidrs
  }

  egress {
    from_port   = 0
    to_port     = 0
    protocol    = "-1"
    cidr_blocks = ["0.0.0.0/0"]
  }
}

resource "aws_instance" "single_ec2" {
  depends_on    = [ module.vpc ]
  key_name      = var.key_name
  ami           = var.ami
  instance_type = var.instance_type

  vpc_security_group_ids = [
    aws_security_group.ssh.id
  ]
  subnet_id = module.vpc.public_subnets[0]

  root_block_device {
    volume_size    = 8
    volume_type    = "gp2"
  }

  tags = {
    Name = "ec2-ebs-demo"
  }

  provisioner "file" {
    source      = "bootstrap.sh"
    destination = "/home/ubuntu/bootstrap.sh"
    connection {
      host        = self.public_ip
      user        = "ubuntu"
      private_key = file(var.key_path)
    }
  }
}

resource "aws_ebs_volume" "single_ec2_ebs" {
  availability_zone = aws_instance.single_ec2.availability_zone
  size              = 10
  tags = {
    Name = "ec2-ebs-single-demo"
  }
}

resource "aws_volume_attachment" "single_ec2_ebs_att" {
  device_name  = var.ebs_att_device_name
  volume_id    = aws_ebs_volume.single_ec2_ebs.id
  instance_id  = aws_instance.single_ec2.id
  force_detach = true
}


resource "aws_instance" "multi_ec2" {
  count         = length(var.public_subnets)
  depends_on    = [ module.vpc ]
  key_name      = var.key_name
  ami           = var.ami
  instance_type = var.instance_type

  vpc_security_group_ids = [
    aws_security_group.ssh.id
  ]
  subnet_id = module.vpc.public_subnets[count.index]

  root_block_device {
    volume_size   = 8
    volume_type   = "gp2"
  }

  tags = {
    Name = "ec2-ebs-demo"
  }

  provisioner "file" {
    source      = "bootstrap.sh"
    destination = "/home/ubuntu/bootstrap.sh"
    connection {
      host        = self.public_ip
      user        = "ubuntu"
      private_key = file(var.key_path)
    }
  }
}


resource "aws_ebs_volume" "multi_ec2_ebs" {
  count             = length(var.public_subnets)
  availability_zone = aws_instance.multi_ec2[count.index].availability_zone
  size              = 10
  tags = {
    Name = "ec2-ebs-single-demo"
  }
}

resource "aws_volume_attachment" "multi_ec2_ebs_att" {
  count        = length(var.public_subnets)
  device_name  = var.ebs_att_device_name
  volume_id    = aws_ebs_volume.multi_ec2_ebs[count.index].id
  instance_id  = aws_instance.multi_ec2[count.index].id
  force_detach = true
}


####################################################
# Outputs
####################################################

output "public_subnets" {
  value = module.vpc.public_subnets
}

output "ec2_single_public_ip" {
  value = aws_instance.single_ec2.public_ip
}

output "multi_ec2_public_ips" {
  value = aws_instance.multi_ec2[*].public_ip
}
Now after deploying all that is required is to ssh onto the server then make the copied up bootstrap.sh executable and run it like so.
ssh ubuntu@ip-address -i /path/to/ec2-ebs-demo.pem
chmod +x bootstrap.sh
./bootstrap.sh
Tearing Down the Resources
If you have followed along and ran through the same provisioning steps you likely will want to destroy the resources to minimize the charges incurred in AWS. Run the following from the same directory as the main.tf file.
terraform destroyIt is always a good idea to take a peek in the AWS Management Console to be sure the EC2 and EBS resources were in fact destroyed.
Conclusion
In this article I have demonstrated how to use the popular Infrastructure as Code tool Terraform to create AWS EC2 instances along with EBS volumes. I then walked through the process of mounting a EBS volume on a Linux EC2 server to round out the use case.
As always, thanks for reading and please do not hesitate to critique or comment below.